Anup Shah on WPF and Silverlight (Programming Garden)

IT 's For You!!!

Saturday, February 18, 2012

When should I use WPF...?


 When should I use WPF instead of DirectX? (Is DirectX dead?)


DirectX is definitely not dead and is still more appropriate than WPF for advanced developers writing hard-core “twitch games” or applications with complex 3D models where you need maximum performance. That said, it’s easy to write a naive DirectX application that performs far worse than a similar WPF application.
DirectX is a low-level interface to the graphics hardware that exposes all of the quirks of
whatever GPU a particular computer has. DirectX can be thought of as assembly language in
the world of graphics: You can do anything the GPU supports.

WPF provides a high-level abstraction that takes a description of your scene and
figures out the best way to render it, given the hardware resources available. Internally, this
might involve using Shader Model 3.0, or the fixed-function pipeline, or software. (Don’t worry if you’re not familiar with these terms, but take it as a sign that you should be using WPF!).

The downside of choosing DirectX over WPF is a potentially astronomical increase in development cost. A large part of this cost is the requirement to test your application on each
driver/GPU combination you intend to support. One of the major benefits of building on top of WPF is that Microsoft has already done this testing for you! You can instead focus your
testing on low-end hardware for measuring performance. The fact that WPF applications can
even leverage the client GPU over Remote Desktop or in a partial-trust environment is also a
compelling differentiator.

When should I use WPF instead of Windows Forms?(Is Windows Forms dead?)

WPF is clearly more suitable for applications with rich media, but some people have said that Windows Forms is the best choice for business applications with traditional user interfaces. I think this belief is based on first versions of WPF in which many standard controls didn’t exist (such as TreeView, ListView, and OpenFileDialog) and a visual designer didn’t exist, making traditional Windows application development in WPF harder than in Windows Forms. Although Windows Forms still has useful controls that WPF lacks (such as DataGridView and PropertyGrid) and at the time of writing has a larger set of third-party controls in the marketplace, WPF has compelling features even for traditional user interfaces (such as the support for resolution independence or advanced layout).

When should I use WPF instead of Adobe Flash?

For creating rich web content, Flash is currently the most popular option because of its ubiquity.
You can put Flash-based content on a website with confidence that the overwhelming
majority of visitors already have the necessary player installed. (And if they don’t, it’s a very
quick download.)

WPF applications can also run within a web browser. WPF has the advantage of better development
tools and programming model, a richer feature set, robust control reuse, broad
programming language support, and full access to the underlying platform (when security
permits). But viewing such content requires Windows and the .NET Framework 3.0 (installed
by default on Windows Vista or later).

Friday, February 17, 2012

Anup Shah on WPF and Silverlight: Architecture...

Anup Shah on WPF and Silverlight: Architecture Of WPF
Above figure shows the overall architecture of WPF. It has three major sections presentation core, presentation framework and milcore. In the same diagram we have shown how other section like direct a...
View or comment on Anup Shah's post »
Google+ makes sharing on the web more like sharing in real life. Learn more.
Join Google+
You have received this message because Anup Shah shared it with anupshah2it.netspider@blogger.com. Unsubscribe from these emails.
, ,

Architecture Of WPF

********************************************************************************
Can you explain the overall architecture of WPF?
********************************************************************************


Above figure shows the overall architecture of WPF. It has three major sections presentation core, presentation framework and milcore. In the same diagram we have shown how other section like direct and operating system interact with the system. So let’s go section by section to understand how every section works.

User32:- It decides which goes where on the screen.

DirectX: - As said previously WPF uses directX internally. DirectX talks with drivers and renders the content.

Milcore: - Mil stands for media integration library. This section is a unmanaged code because it acts like a bridge between WPF managed and DirectX / User32 unmanaged API.

Presentation core ;- This is a low level API exposed by WPF providing features for 2D , 3D , geometry etc.

Presentation framework:- This section has high level features like application controls , layouts . Content etc which helps you to build up your application


, ,

Wednesday, February 15, 2012

Ques.


************************************************************
Difference between DataSet and DataReader 
************************************************************
DataReader 
=========== 
DataReader is like a forward only recordset. It fetches one row at a time so very less network cost compare to DataSet(Fethces all the rows at a time). DataReader is readonly so we can't do any transaction on them. DataReader will be the best choice where we need to show the data to the user which requires no transaction. As DataReader is forward only so we can't fetch data randomly. .NET Data Providers optimizes the datareader to handle huge amount of data.
 

DataSet
 
=======
 
DataSet is an in memory representation of a collection of Database objects including tables of a relational database schemas.
 
DataSet is always a bulky object that requires a lot of memory space compare to DataReader. We can say that the DataSet is a small database because it stores the schema and data in the application memory area. DataSet fetches all data from the datasource at a time to its memory area. So we can traverse through the object to get the required data like querying database.


************************************************************
What is the difference between app.config, web.config and machine.config ?
************************************************************

In this .NET Interview questions interviewer expects two things. First the importance of configuration and second in which scenarios are the above file applicable. So lets answer the question in two parts.

### The importance of config files  ### 

App.config, web.config and machine.config are files which store configuration data in XML

format. We need configuration data at application level or at machine/server level.

### Scenarios in which the above config files are used  ### 

Machine.config file stores configuration information at system level. It can contain configuration information like timeout in ASP.NET application, requestLimit, memoryLimit, and ClientConnectedCheck etc.

Generally we have two kinds of application web application and windows application. Web.config file stores configuration data for web applications and app.config file store configuration information for windows application.

Application level configuration data can be like connection strings,security etc.


************************************************************
What is Encapsulation?
***********************************************************

  • Encapsulation is one of the fundamental principles of object-oriented programming.
  • Encapsulation is a process of hiding all the internal details of an object from the outside world
  • Encapsulation is the ability to hide its data and methods from outside the world and only expose data and methods that are required
  • Encapsulation is a protective barrier that prevents the code and data being randomly accessed by other code or by outside the class
  • Encapsulation gives us maintainability, flexibility and extensibility to our code.
  • Encapsulation makes implementation inaccessible to other parts of the program and protect from whatever actions might be taken outside the function or class.
  • Encapsulation provides a way to protect data from accidental corruption
  • Encapsulation hides information within an object
  • Encapsulation is the technique or process of making the fields in a class private and providing access to the fields using public methods
  • Encapsulation gives you the ability to validate the values before the object user change or obtain the value
  • Encapsulation allows us to create a "black box" and protects an objects internal state from corruption by its clients.

, ,

Monday, February 6, 2012

The Model-View-ViewModel Pattern

How the MVVM pattern became convenient
WPF has a very powerful databinding feature, that provides an easy one-way or two-way synchronization of properties. You can directly bind two WPF elements together, but the common use of databinding is to bind some kind of data to the view. This is done by using the DataContext property. Since the DataContext property is marked as inherited, it can be set on the root element of a view and it's value is inherited to all subjacent elements of the view.
One big limitation of using the DataContext property as data source is, that there is only one of it. But in a real life project you usually have more than one data object per view. So what can we do? The most obvious approach is to aggreate all data objects into one single object that exposes the aggregated data as properties and that can be bound to theDataContext. This object is called the view model.

Separation of logic and presentation

The MVVM pattern is so far only a convenient way to bind data to the view. But what about user actions, how are they handeld? The classic approach, known from WinForms is to register an event handler, that is implemented in the code-behind file of the view. Doing this has some disadvantages:
  • Having event handlers in the code-behind is bad for testing, since you cannot mock away the view.
  • Changing the design of the view often also requires changes in the code, since every element has it's different event handlers.
  • The logic is tightly bound to the view. It's not possible to reuse the logic in an other view
So the idea is to move the whole presentation logic to the view model by using another feature of WPF, namely Commands. Commands can be bound like data and are supported by many elements as buttons, togglebuttons, menuitems, checkboxes and inputbindings. The goal here is not to have any line of logic in the code-behind of a view. This brings you the following advantages
  • The view-model can easily be tested by using standard unit-tests (instead of UI-testing)
  • The view can be redesigned without changing the viewmodel, because the interface stays the same.
  • The view-model can even be reused, in sone special cases (this is usually not recommended)

What's the difference between MVVM, MVP and MVC?

There is always some confusion about the differences between model-view-presenter, model-view-controller an MVVM pattern. So I try to define and distinguish them a bit more clearly.

MVC - Model-View-Controller

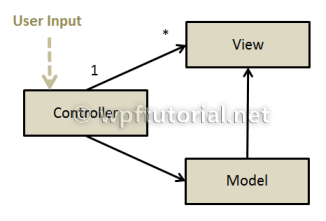
The MVC pattern consists of one controller that directly gets all user input. Depending of the kind of input, he shows up a different view or modifies the data in the model. The model and the view are created by the controller. The view only knows about the model, but the model does not know about any other objects. The pattern was often used in good old MFC and now in ASP.NET MVC

MVP - Model-View-Presenter

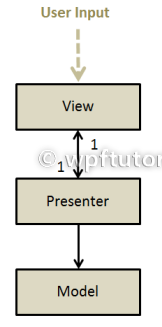
In the MVP pattern, the view gets the user input and forwards it to the presenter. The presenter than modifies the view or the model depending on the type of user action. The view and the presenter are tightly coupled. There is a bidirectional one-to-one relation between them. The model does not know about the presenter. The view itself is passive, thats why it's called presenter pattern, since the presenter pushes the data into the view. This pattern is often seen in WinForms and early WPF applications.

MVVM - Model-View-ViewModel

The model-view-viewmodel is a typically WPF pattern. It consists of a view, that gets all the user input and forwards it to the viewmodel, typically by using commands. The view actively pulls the data from the viewmodel by using databinding. The model does not know about the view model.


Wednesday, February 1, 2012

DataContext


WPF provides a simple and powerful way to auto-update data between the business model and the user interface. This mechanism is called DataBinding. Everytime when the data of your business model changes, it automatically reflects the updates to the user interface and vice versa. This is the preferred method in WPF to bring data to the user interface.

Databinding can be unidirectional (source -> target or target <- source), or bidirectional (source <-> target).

The source of a databinding can be a normal .NET property or a DependencyProperty. The target property of the bindingmust be a DependencyProperty.

To make the databinding properly work, both sides of a binding must provide a change notification that tells the binding when to update the target value. On normal .NET properties this is done by raising the PropertyChanged event of theINotifyPropertyChanged interface. On DependencyProperties it is done by the PropertyChanged callback of the property metadata

Databinding is typically done in XAML by using the {Binding} markup extension. The following example shows a simple binding between the text of a TextBox and a Label that reflects the typed value:

Every WPF control derived from FrameworkElement has a DataContext property. This property is meant to be set to the data object it visualizes. If you don't explicity define a source of a binding, it takes the data context by default.

The DataContext property inherits its value to child elements. So you can set the DataContext on a superior layout container and its value is inherited to all child elements. This is very useful if you want to build a form that is bound to multiple properties of the same data object.


ValueConverters

If you want to bind two properties of different types together, you need to use a ValueConverter. A ValueConverter converts the value from a source type to a target type and back. WPF already includes some value converters but in most cases you will need to write your own by implementing the IValueConverter interface.

A typical example is to bind a boolean member to the Visibility property. Since the visibility is an enum value that can be Visible, Collapsed or Hidden, you need a value converter.


The following example shows a simple converter that converts a boolen to a visibility property. Note that such a converter is already part of the .NET framework.


-> you can derive your value converter from MarkupExtension and return its own instance in the ProvideValueoverride. So you can use it directly without referencing it from the resources.

-> When you get the error "No constructor for type '...' has 0 parameters.", you need to add an default constructor to your converter, even it's not needed. Just for the WPF designer.


WPF - Basic layout using the Grid


WPF - Basic layout using the Grid

The final result

Your application layout is one of the first things you have to plan before starting the actual development. In this basic tutorial, I will show you how to design a basic layout for your applications using the Grid control.


First of all, we will need to create a new WPF Application project. To do so, fire up Visual Studio and select File > New > Project... Choose WPF Application and click OK. Once your project has been created, we will change the size of our application window so we can better see our progress as shown in the following code snippet:

<Window x:Class="WPFBasicLayout.Window1"     xmlns="http://schemas.microsoft.com/winfx/2006/xaml/presentation"     xmlns:x="http://schemas.microsoft.com/winfx/2006/xaml"     Title="WPF Basic Layout" Height="350" Width="500">     <Grid>
     </Grid> </Window>

Notice that Visual Studio automatically places a Grid control for us. The Grid is the most complex layout control and probably the one we will use the most. Our next task is to declare columns and rows definitions inside our Grid. The idea is to have four parts in our application: the header, the footer, a sidebar and the main content.

<Grid.ColumnDefinitions>     <ColumnDefinition />     <ColumnDefinition /> </Grid.ColumnDefinitions> <Grid.RowDefinitions>     <RowDefinition />     <RowDefinition />     <RowDefinition /> </Grid.RowDefinitions>

So far, our window should look like this in the Visual Studio designer:

Rows and columns definitions

To keep this tutorial simple, we will use Border and Label controls as the content of the four parts of our application. We will add one Border and a Label for each part of our application. Notice how we place them in the row and column we want using Grid.Row and Grid.Column properties respectively:

<Border Grid.Column="0" Grid.Row="0" Grid.ColumnSpan="2" BorderBrush="LightBlue" BorderThickness="2,2,2,2" CornerRadius="10,10,10,10" Margin="05,05,05,05">     <Label FontSize="24" VerticalAlignment="Center" HorizontalAlignment="Center">Header</Label> </Border> <Border Grid.Column="0" Grid.Row="1" BorderBrush="LightBlue" BorderThickness="2,2,2,2" CornerRadius="10,10,10,10" Margin="05,05,05,05">     <Label FontSize="24" VerticalAlignment="Center" HorizontalAlignment="Center">Sidebar</Label> </Border> <Border Grid.Column="0" Grid.Row="2" Grid.ColumnSpan="2" BorderBrush="LightBlue" BorderThickness="2,2,2,2" CornerRadius="10,10,10,10" Margin="05,05,05,05">     <Label FontSize="24" VerticalAlignment="Center" HorizontalAlignment="Center">Footer</Label> </Border> <Border Grid.Column="1" Grid.Row="1" BorderBrush="LightBlue" BorderThickness="2,2,2,2" CornerRadius="10,10,10,10" Margin="05,05,05,05">     <Label FontSize="24" VerticalAlignment="Center" HorizontalAlignment="Center">Main Content</Label> </Border>

Notice also the Grid.ColumnSpan property. That means that that specific column will take two columns, beginning from the one it was placed. This happens with the header and the footer because we want then to take all the width they have available.

In future posts, I will show you how to move those repeated properties into Styles for cleaner code.

Our application is getting the look we are looking for, but as you can see we got some problems: the header and the footer are too big and the sidebar and the main content are taking the same space. What we want is a smaller header and footer and a thinner sidebar, so the room left is taken by the main content. In order to get the desired effect, we need to add Width and Height properties to some of the ColumnDefinition and RowDefinition elements respectively. We will set those properties to Auto for the the first column and for the first and third row. That way, the header, the footer and the sidebar will resize accordingly based on the size of their content. All the room left will be available for the main content.

<Grid.ColumnDefinitions>     <ColumnDefinition Width="Auto"/>     <ColumnDefinition /> </Grid.ColumnDefinitions> <Grid.RowDefinitions>     <RowDefinition Height="Auto"/>     <RowDefinition />     <RowDefinition Height="Auto"/> </Grid.RowDefinitions>

Now it is time to run our application and check the final result. As you can see, the layout is pretty basic but quite common and useful. Notice how the different parts of our application are resized accordingly when the application is resized or maximized.

Now that you have this basic layout set up, it is up to you to add controls, images and text to improve the results.


LINQ Basics

Defintion
  • LINQ unifies data access, whatever the source of data, and allows mixing data from different kind of sources.
  • LINQ provides a uniform way to retrieve data from any object that implements the Enumerable interface.

Microsoft has introduced LINQ with many goals in mind to bring down the way data is accessed from different datasource, by using LINQ we can use a uniform query to perform operations on various datasource, it also answers disadvanatges of SQL

Disadvantages of SQL

  • Compile time support: You cannot know until run time whether the string is correct because the compiler treats it as a simple string.
  • Design time support: No tool offers IntelliSense support for these command strings

To solve this queries should be integrated into a language, which then can be verified both during compile time as well as runtime and important part is it can offer intellisence support also.

LINQ addresses both these issues. Because the queries are integrated into the language, they are verified during compilation and you have IntelliSense support for them.

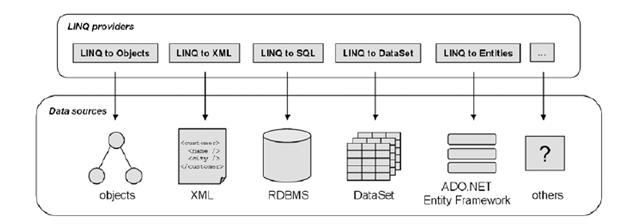
There are various data providers which is shown below

  1. LINQ to Objects
  2. LINQ to XML
  3. LINQ to SQL
  4. LINQ to DataSet
  5. LINQ to Entities


LINQ to Objects

LINQ to Objects allows .NET developers to write “queries” over collections of objects.

let me take 2 example one without LINQ and another using LINQ


Now let us separate the words whose length is greater then 5,To perform this we should iterate all the members of an array which is tedious and with more CPU Utilizing.

class HelloWorld

{

static void Main()

{

string[] words = new string[] {“Sadhana”, “Naveen”, “Praveen”, “Pankaj”, “Abhilash” };

foreach (string word in words)

{

if (word.Length <= 5)

Console.WriteLine(word);

}

}

}

The same can be achieved using LINQ

class Hello_LINQ_to_Objects_Demo1

{

static void Main()

{

String[] champion_names = {“Sadhana”, “Naveen”, “Praveen”, “Pankaj”, “Abhilash” };

var short_name = from name in champion_names

where name.Length >= 5

select name;

foreach (var word in short_name)

Console.WriteLine(word);

Console.ReadLine();

}

}


Take this example which which uses LINQ with class

class CustomerDetails

{

public string customer_name;

public int customer_id;

public string customer_address;

public double customer_purchase_cost;

public string customerName

{

get{return customer_name;}

set{customer_name=value;}

}

public int customerId

{

get{return customer_id;}

set{customer_id=value;}

}

public string customerAddress

{

get{return customer_address;}

set{customer_address=value;}

}

public double customerPurchaseCost

{

get{return customer_purchase_cost;}

set{customer_purchase_cost=value;}

}

}

class Program

{

static void Main(string[] args)

{

Console.WriteLine(“Enter the Customer Name”);

string name = Console.ReadLine();

var customerdetails = new List<CustomerDetails>

{

new CustomerDetails

{

customerName=“Naveen”,

customerId=110,

customerAddress=“Bannerghatta Road Bangalore 560076″,

customerPurchaseCost=100000

},

new CustomerDetails

{

customerName=“Praveen”,

customerId=111,

customerAddress=“Adugudi Road Bangalore 560076″,

customerPurchaseCost=100000

},

new CustomerDetails

{

customerName=“Sadhana”,

customerId=112,

customerAddress=“JP Nagar Bangalore 560076″,

customerPurchaseCost=100000

},

};

var Found = from details in customerdetails

//where details.customerName == “Sadhana”

where details.customerName == name

select details.customerAddress;

//details.customerId & details.customerAddress;

// Display results.

foreach (var Result in Found)

Console.WriteLine(“Address: “ + Result.ToString());

Console.ReadLine();

}

ADVERTISEMENT